Process — Building an igloo from blocks of snow
📄 Bài mẫu band 8–9
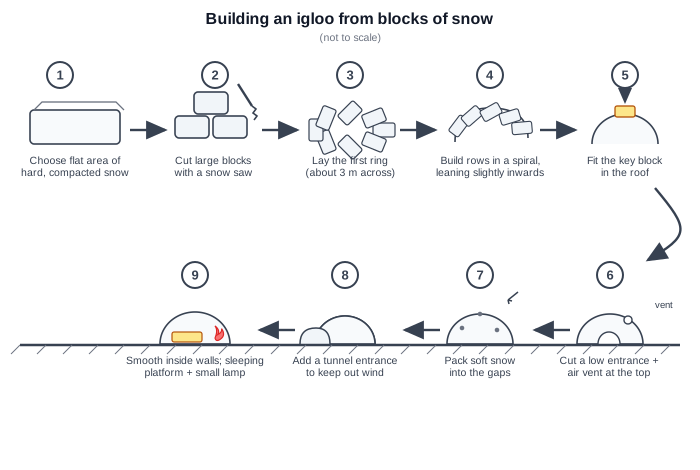
| Introduction | Paraphrase: sơ đồ mô tả các giai đoạn dựng một căn igloo từ những khối tuyết nén. |
| Overview | Overall: 9 bước, chia 2 pha rõ — dựng thân vòm từ khối tuyết cắt sẵn, rồi hoàn thiện (thông khí, trám khe, hầm lối vào, nội thất). |
| Body 1 | Bước 1–5: chọn nền tuyết cứng → cưa khối lớn → xếp vòng tròn ~3 m → xếp xoắn ốc nghiêng vào trong → đặt khối chốt đỉnh. |
| Body 2 | Bước 6–9: khoét cửa thấp + lỗ thông khí → trám tuyết mềm vào khe → đắp hầm lối vào chắn gió → làm nhẵn vách trong, thêm bệ ngủ và đèn. |
The diagram illustrates the process by which an igloo is constructed using blocks of compacted snow.
Overall, there are nine stages, which fall into two broad phases: the dome itself is first assembled from pre-cut blocks, after which the shelter is sealed, ventilated and furnished. Interestingly, the structure gains its strength not from any framework but from the spiral arrangement of the blocks themselves.
To begin with, a flat area of hard, well-compacted snow is selected, and large blocks are cut from it with a snow saw. These blocks are then laid in a circle roughly three metres across. Successive rows are added in a spiral, each one leaning slightly further inwards, until only a small opening remains at the top; this is closed with a single key block, which locks the whole dome in place.
Once the shell is complete, a low doorway and a ventilation hole are cut, and soft snow is packed into the gaps between the blocks to seal them. A short tunnel is then built over the entrance to keep out the wind. Finally, the interior walls are smoothed, and a sleeping platform and a small lamp are added, making the igloo ready for use.
| compacted snow | tuyết nén chặt |
| pre-cut blocks | các khối cắt sẵn |
| in a spiral | theo hình xoắn ốc |
| leaning slightly further inwards | nghiêng vào trong |
| key block | khối chốt đỉnh |
| ventilation hole | lỗ thông khí |
| packed into the gaps | trám kín khe hở |
| ready for use | sẵn sàng sử dụng |